INTRODUCTION
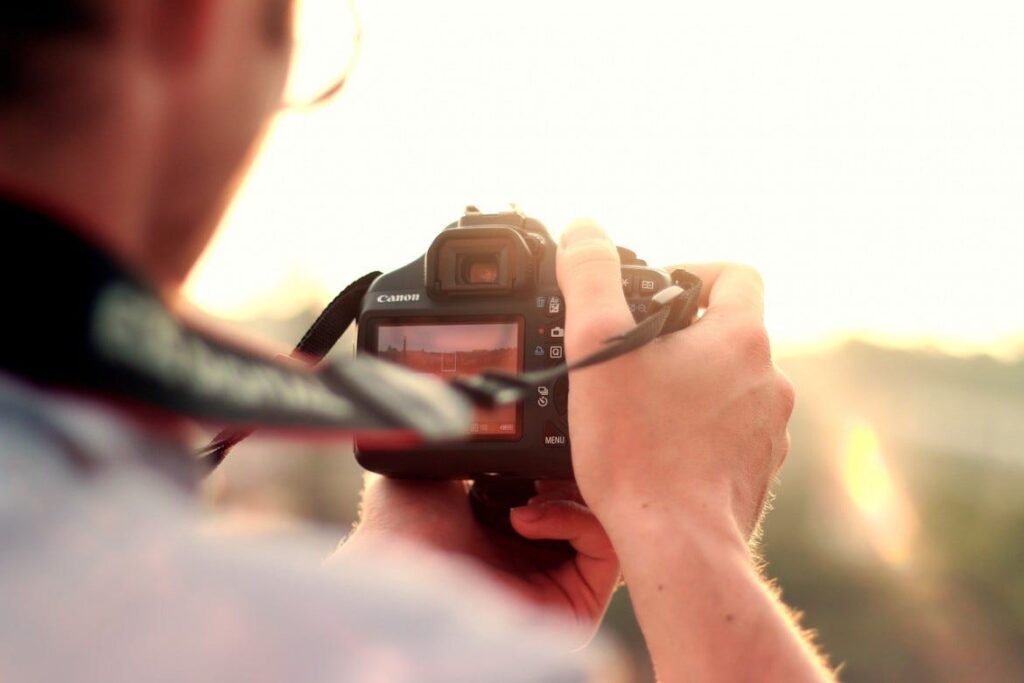
Photeeq Lens Flare, Photography is a fast-changing art whose very nature is influenced by programs and tools for editing the image. One of the most widely pursued effects in photography and cinema is the lens flare effect. Applying it correctly enables a photographer to create warmth, drama, and realism. As one of the most-wanted effects for photo editing, the lens flare offer is pressingly demanded by photo editors on Photeeq, an extraordinarily rich and popular photo-editing application.
This guide will provide you with an in-depth understanding of the Photeeq lens flare, including its application, advantages, and tips you can use to exploit its full potential.
What Is Lens Flare?
A lens flare is a phenomenon characterized by the scattering of light inside the glass layers of a lens system, producing streaks, circular shapes, or lights. Lens flare, while at times an unintended side effect, can also be used intentionally for the increase of good-engineered images. Lens flare effects can be use to render atmosphere, feeling, and even artistic depth by a photographer.
Understanding Photeeq Lens Flare Function
Photeeq is very known for its strong editing features and offers very realistic lens flare effects that simulate reflection of direct sunlight. The software has empowered photographers and designers to integrate flares in images easily so as to enhance their general composition and mood.
Key Features of Photeeq Lens Flare
Realistic Effects: The tool replicates natural lens flare to add authenticity to images.
Customizable Options: Users can adjust intensity, size, and color to match specific needs.
Easy Integration: The effect blends easily with already-existing images.
Quality Output: High resolution without loss in sharpness or clarity and distortion.
User-Friendly Interface: Designed to be easy and fast, allowing for quick application and adjustments.
How to Enhance the Use of Photeeq Lens Flare
Step 1: Picking the Right Image
Images with lens flare have stronger light sources. Luminosity from sunlight, headlights, or bright objects should be present in such images.
Step 2: Adjusting the Position
Place the lens flare in alignment with the existing light source, so it remains realistic. Mismatched flares will only throw off the natural feel of the image.
Step 3: Adjusting Brightness and Intensity
The brightness must be adjuste to prevent burning-out. Intensity should be modifiy in response to the light conditions of the scene. The higher intensity is reserved for more theatrically stagde images, whereas the lower one is the more discreet, and less annoying variation.
Step 4: Blending and Color Correction
Photeeq blending options allow natural flare integration. Matching the temperature of the flare with the scene maintains consistency. Adjust hue and saturation for harmony.
Step 5: Final Adjustments and Exporting
After applying the effect, further fine-tune contrast, sharpness, and saturation before exporting. Save the image in high-resolution mode to maximize quality.
Benefits of Using Photeeq Lens Flare
Elevating Mood and Atmosphere
The lens flare brings a dreamy, cinematic touch, increasing the mood of the image, which is heavy with emotional meanings and might cause more interaction with the viewer.
Giving a Flash of Depth and Dimension
Lens flare does wonderful things when it comes to adding highlights and reflections to give an image depth and life; it gives an impression of room in the image while simultaneously enhancing the overall charm.
Professional Appeal
In commercial apps, including advertising, the lens flare gives images a polished and marketable finish. Pro photographers often utilize the effect as their trademark.
Versatility
Lens flare is applicable from portraiture to landscape imagery-giving the artist freedom of expression. It suits fashion work, nature, and urban photography-a distinct style of vision.
Deepening the Narrative
A well-placed lens flare can produce an emotional connection, allowing the viewer to feel as if they are in the image with their own memories of warmth, nostalgia, or excitement from the depicted scene.
Common Mistakes and How to Avoid Them
Overzealous Use of Lens Flare
Excessive lens flare will end up covering highlights and details, making images look exceptionally artificial. Well, use lens flare artfully. Less is usually best in terms of natural feel for the photo.
Random Placement
Flares that are put haphazardly will render an unrealistic image. Align it with the existing light source for realism. Make a note of how natural light behaves to make your flares look believable.
Ignoring Color Matching
A flare of color temperature that does not match will be out of place. Adjust hue and warmth so it looks believable. Make sure that the flare matches existing tones.
Applying Flare on Low-Light Images
The best scenes to apply lens flare are light, bright, and illuminated. Placing it in dull images could starkly contrast nature. Subtle manual lighting may enhance viewability first before applying any effects.
Also read: 5StarsStocks.com Stocks: A Comprehensive Guide
Advanced Techniques for Getting That Professional Look
Layering Multiple Flares
Strategically placed show flares deepen the perception of reality. Layering subtle flares definitely makes them stand out in composition. Play with flare sizes and intensities to create a dynamic engagement.
Combining Lens Flare with Additional Effects
Combining lens flare with light leaks or bokeh creates richness and texture in images. This mixture helps create a particular artistic expression.
Gradient and Masking Tools
Gradient and masks can be use to blend flares in a way that prevents harsh edges. Gradually transitioning into the effect allows it to be more natural and cohesive.
Creating Custom Lens Flare Styles
Creating custom lens flare effects by changing opacity, blur, and diffusion results in one-of-a-kind outputs. Try tweaking different settings to get that unique signature effect that flaunts its presence.
Comparison: Photeeq vs. Other Lens Flare Tools
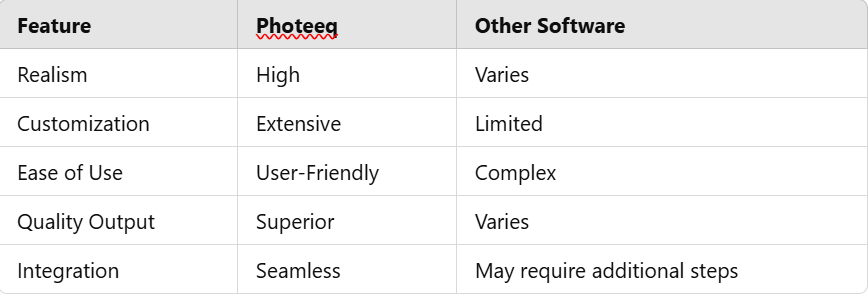
With an excellent balance of simplicity and professional output, Photeeq easily remains highly favored among photographers.
End note
The Photeeq lens flare is indeed a very powerful element that transforms an average-looking picture into a real visual composition. It can, therefore, bring mood, depth, and even enhance the beauty of photographs. Photographers that practice the best applications and ditch the common mistakes are bound to produce professional outcomes without an effort being made on the photographs. This feature by Photeeq will act as a magic wand for any photographer who seeks to create world-class art, be it a project by the studio or personal creativity. Proper techniques and thoughtful application will infuse fresh life into the images and breathe more engagement and visually compelling photography.